How Flowmingo Works
Working with Flowmingo
Working with Flowmingo is very easy and consists of only a few steps.
- Create a Workflow Template in our Workflow Process Designer
- Optionally create a Data form and attach it to a Workflow Template
- Publish the Workflow Template
- "Start" a workflow using the template.
Workflow Templates
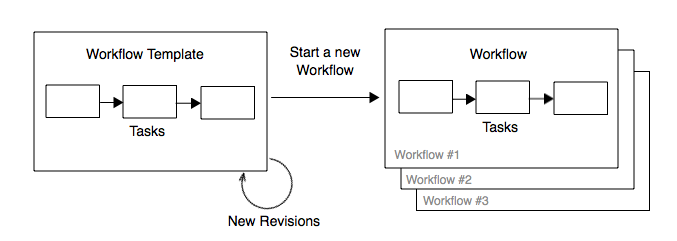
A workflow template is the blue print for how a workflow will work where all the tasks are laid out in the order they will be executed. Like a cookie cutter, once created, a workflow template is then used to create actual workflow instances. These workflow instances, and their tasks, are what your users will interact with to complete their work.
In Flowmingo, workflow templates are created using our drag and drop, Workflow Process Designer. Tasks are created, users assigned and then connected if the correct order. After creating a workflow template the process designer then publishes the template for use. Once published, the workflow template will appear and the "Start Tab" and is then available for use.

Starting a workflow
All published workflow templates are displayed under the Start Tab. From there, users are able to start individual instances of workflows from the list of published workflow templates. Depending on the workflow template settings, users may be prompted to enter data when starting a workflow. For instance, entering a workflow name or tracking number.
Getting your work done
Once a workflow is created, users will see their tasks in the dashboard. The dashboard is the central area for users. Users are able to quickly see and interact with all of their assigned tasks and workflows. Users are able to complete tasks, make comments, or even reassign them to another team member.